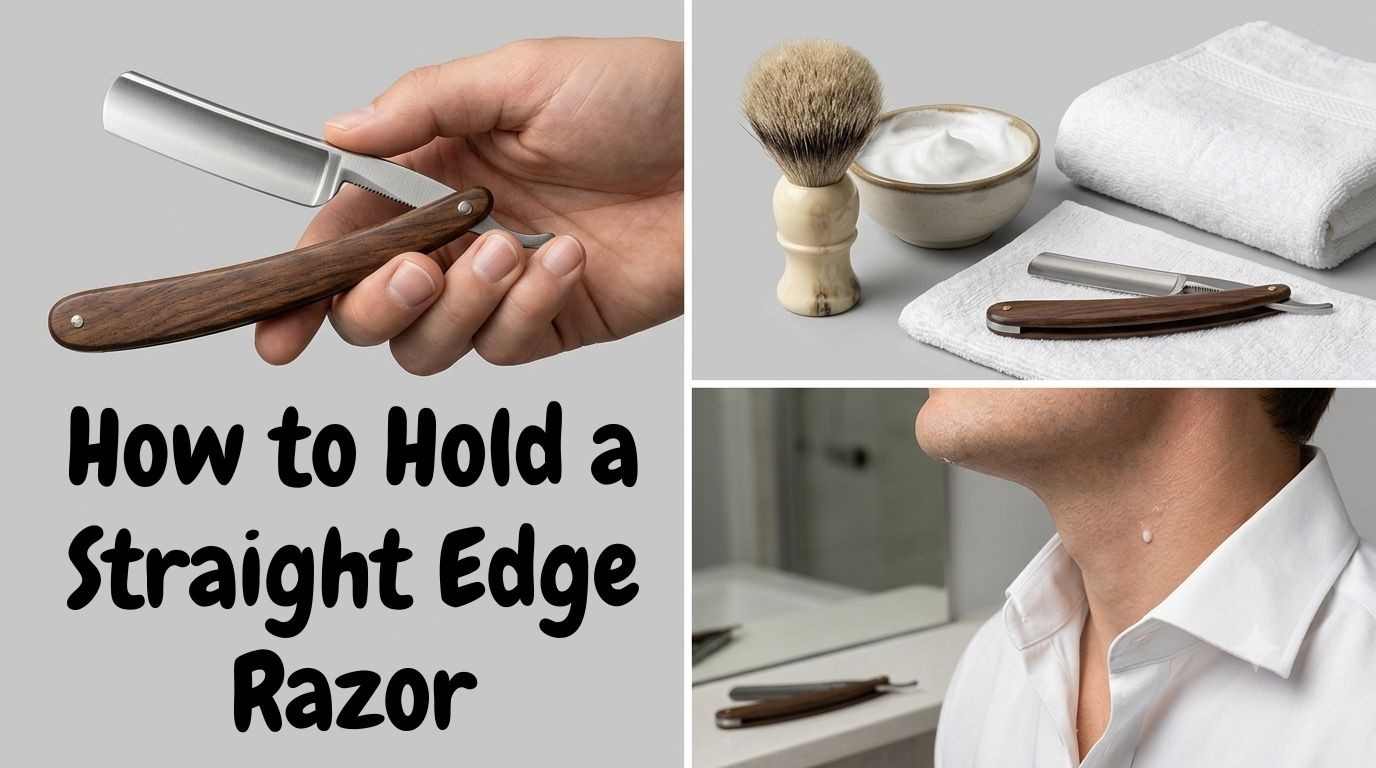
To hold a straight edge razor, open it so the scales extend back from the blade, place your thumb under the shank on the jimps, rest three fingers along the top of the shank, and let your pinky sit on the tail of the tang. Keep your grip relaxed, hold the blade at about 30 degrees to your skin, and let the weight of the steel do the cutting.
If you approach a straight razor with a rigid, tense grip or hold it like a standard kitchen knife, you are essentially asking for razor burn, nicks, and frustration. A straight razor requires a delicate balance of stability and fluid flexibility. Your hand must act as a steady guide while allowing the steel blade’s weight to do all the heavy lifting.
This guide covers the parts of a straight razor, the four grips (standard, backhand, reverse and reverse backhand), and how to adjust your hand around the jawline and neck.
1. Anatomy of a Straight Edge Razor: The Blueprint of Your Grip
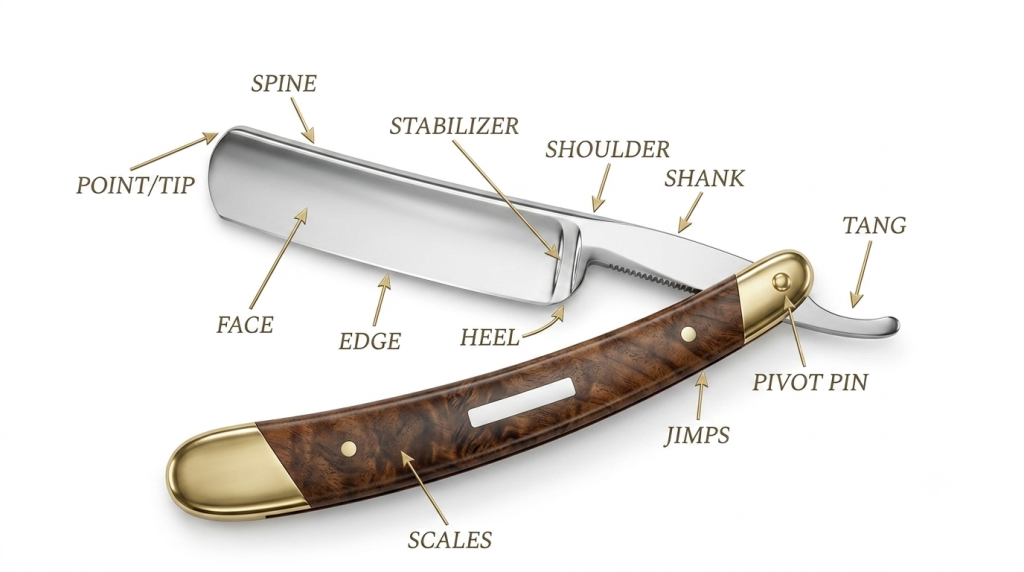
Before the grips, it helps to know what your fingers are actually touching. Each part of a straight razor plays a role in balance and control, so here is a quick tour of the components.
The Scales (The Handle)
The handle of a straight edge razor is technically referred to as the scales. Beyond protecting the razor’s delicate cutting edge when it’s folded shut, the scales also serve as a vital counterweight while you shave. When the razor is fully unfolded, the scales typically extend away from the blade at an angle of 120 to 180 degrees, resting safely between your fingers to provide balance.
The Pivot Pin
This is the tiny screw or rivet where the blade meets the scales. The pivot pin must be tight enough to hold the scales securely in place at whatever angle you position them, yet fluid enough to let you adjust the configuration mid-shave without struggling.
The Tang and Tail
Extending past the pivot pin is the narrow metal extension known as the tang. The curved, upward-sweeping end of the tang is called the tail. This section is one of the most critical structural areas for stabilizing your grip. It acts as a lever, with your ring or pinky finger resting on it, to keep the blade from pivoting unexpectedly during a stroke.
The Shank and Jimps
The shank is the straight metal section located between the pivot pin and the actual cutting blade. If you look closely at the top or underside of the shank on a high-quality razor, you will notice small, ridged grooves cut into the steel. These ridges are called jimps. Jimps are engineered to provide friction, ensuring your fingers do not slip even when wet or covered in slippery shaving soap.
The Spine, Face, and Cutting Edge
The thick, heavy top border of the blade is the spine. The spine provides the structural weight that allows the razor to cut hair effortlessly without requiring downward physical pressure. The flat side of the blade is called the face, and the finely honed bottom line is the cutting edge.
The Heel and Toe
The heel is the rear corner of the cutting edge located closest to the shank, while the toe (or point) is the front tip of the blade. Understanding where the heel and toe are positioned at all times is crucial for avoiding accidental nicks when navigating the tight contours around your nostrils, ears, and mouth.
2. The Golden Rules Before the Blade Meets Skin
Before we dive into the specific finger placements for the four primary grips, there are three fundamental rules of straight edge razor geometry that you must internalize. No matter which grip you are utilizing, these laws remain entirely non-negotiable.
Rule 1: The 30-Degree Angle Rule
Unlike cartridge razors that have built-in plastic angles, a straight razor requires you to manually maintain the correct cutting angle. The sweet spot for an efficient shave is approximately 30 degrees relative to the skin.
- If you tilt the spine too far away from your face (an angle greater than 30 degrees), the blade turns into a scraper, aggressively removing skin cells and causing severe razor burn.
- If you lay the blade too flat against your face (an angle less than 15 degrees), the spine will push the hair down instead of cutting it, resulting in a painful tugging sensation.
Rule 2: Absolute Bone-Dry Hands
This is a critical safety rule that beginners often overlook. Shaving creams, oils, and warm water are fantastic for softening facial hair, but they turn a polished steel razor into an incredibly slick hazard. Before you pick up your razor to grip it, thoroughly dry your hands and fingers on a clean towel. A slip of even a millimeter can cause a deep slice.
Rule 3: Zero Downward Pressure
If you are coming from the world of disposable plastic cartridges, your muscle memory is programmed to press the razor down into your skin to get a close shave. You must completely unlearn this habit. A quality straight razor is heavily weighted precisely so that you do not have to press down. Your grip should only guide the razor’s direction; let the steel’s natural weight glide down your face to cleanly slice through your whiskers.
The Grip You Use Off Your Face: Holding the Razor for Stropping
Everything in this guide so far covers holding the razor while shaving. But before every shave with a traditional straight razor, you’ll hold it for a different job: stropping. And the grip is deliberately different.
For stropping, abandon the shaving grip entirely. Pinch the tang between your thumb and forefinger — just those two digits — and let the scales hang open and out of the way. Lay the spine flat on the strop with the edge trailing away from the direction of travel, and draw the razor toward you. At the end of the stroke, roll the razor over its spine to flip it — never lift the edge off the leather mid-turn.
Two beginner errors destroy more edges than bad honing ever will. First, using the full shaving grip on the strop: all those fingers on the shank make the rollover clumsy, and clumsy rollovers nick the strop or lift the edge. Second, flipping the blade edge-first instead of rolling on the spine — that single motion can fold the microscopic edge you’re trying to align.
Keep the strop taut with your free hand, use light, even pressure, and let the spine’s contact with the leather set the angle for you. Fifteen to twenty slow laps on leather before each shave is the standard rhythm. Get the stropping grip right and your razor will arrive at your face in the condition the grip guide assumes it is.
3. The 4 Essential Straight Edge Razor Grips
To complete a full, multi-pass wet shave, you cannot rely on just one hand position. As you move from the flat planes of your cheeks to the deep curves of your neck and jawline, you will need to transition seamlessly between different grips to maintain your optimal 30-degree angle. Here are the four primary grips used by master barbers, broken down step by step.
Grip 1: The Standard (Basic) Grip
The Standard Grip is the absolute foundation of traditional wet shaving. It offers the highest level of stability, control, and sensory feedback, making it the ideal starting position for shaving the flat portions of your cheeks, sideburns, and upper jaw.
How to execute the Standard Grip:
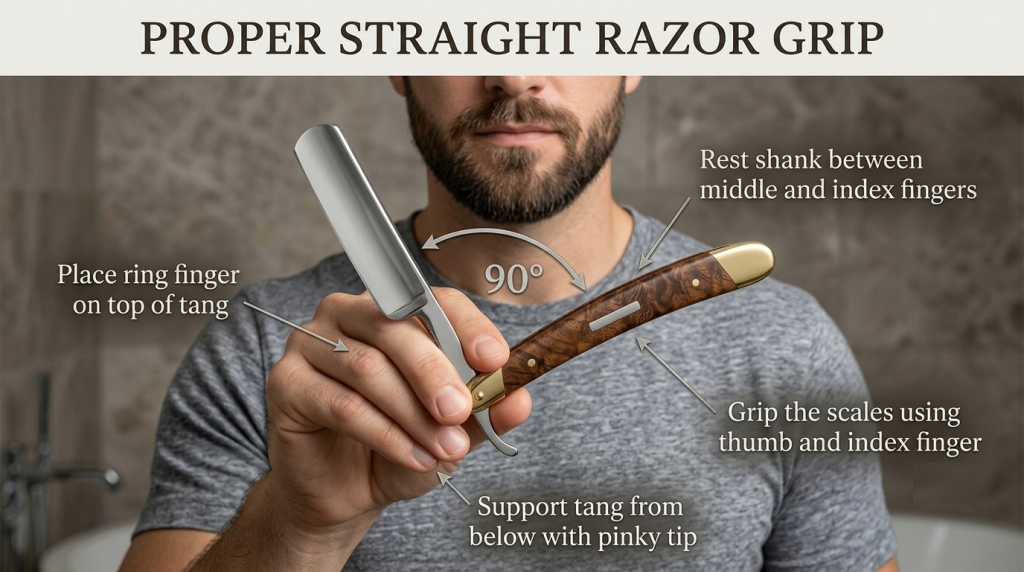
- Open your straight razor until the scales are at roughly a 90- to 120-degree angle relative to the blade.
- Place your thumb on the underside of the shank (on the jimps), just forward of the pivot pin. Your thumb acts as the primary control anchor from below.
- Place your index, middle, and ring fingers in a neat row along the top spine of the shank.
- Rest your pinky finger securely on the curved tail of the tang.
- Allow the unfolded scales to extend upward, resting comfortably between your ring and pinky fingers or extending outward past the back of your hand.
Why it works:
This three-finger-over, one-thumb-under configuration effectively pinches the razor’s shank, providing immense stability. By resting your pinky on the tail, you create an architectural lever that prevents the blade from wobbling or rocking forward during downward strokes.
Grip 2: The Backhand Grip
When you switch to shaving the opposite side of your face with your dominant hand, the Standard Grip can block your reflection in the mirror or force your wrist into an incredibly awkward, strained angle. To solve this, you use the Backhand Grip. This position is perfect for shaving the left sideburn and cheek if you are right-handed (or the right side if you are left-handed).
How to execute the Backhand Grip:
- Start with the razor open at roughly a 90-degree angle.
- Rotate your hand so that your palm is facing away from your face (as if you are looking at the back of your fingernails).
- Place your thumb firmly against the back face of the shank or pivot area.
- Wrap your index, middle, and ring fingers over the top of the shank, curling them slightly around the opposite side.
- Position your pinky finger underneath the tang’s tail to support the weight from below.
- The scales should extend downward, running parallel to your forearm.
Why it works:
By turning your palm outward, you naturally clear a line of sight to the mirror. This allows you to shave down the opposite side of your face using a comfortable, natural pulling motion rather than pushing blindly.
Grip 3: The Reverse Grip
The lower jawline and upper neck are notorious zones for razor burn and nicks because the hair often changes direction, growing upward toward the chin. To perform an efficient upward stroke (against or across the grain) in these regions, you need to turn the razor upside down using the Reverse Grip.
How to execute the Reverse Grip:
- Hold the razor so the cutting edge is pointing upward toward the ceiling.
- Place your thumb on the top of the shank (now facing downward toward your hand).
- Position your index and middle fingers on the opposite side of the shank to create a secure pinch.
- Rest your ring or pinky finger over the tail of the tang to stabilize the tip.
- The scales will dangle downward toward the floor, completely out of your line of sight.
Why it works:
This grip transforms your hand into an upward elevator. It gives you the necessary mechanical leverage to execute smooth, bottom-to-top strokes on the lower neck without bending your wrist back at a dangerous, unstable angle.
Grip 4: The Reverse Backhand Grip
The ultimate test of a wet shaver’s technique is navigating the lower neck and hollow areas underneath the jaw on their non-dominant side. The Reverse Backhand Grip is an advanced maneuver specifically designed to tackle these tricky spots safely.
How to execute the Reverse Backhand Grip:
- Flip the razor upside down so the cutting edge points upward, and turn your palm outward so you are looking at the back of your hand.
- Anchor your thumb on the back of the pivot pin or shank.
- Wrap your index and middle fingers securely over the shank from the front.
- Let the scales extend upward or outward away from your wrist.
- Execute short, controlled upward strokes using your arm and shoulder rather than flicking your wrist.
Why it works:
It provides a completely unobstructed view of your neck in the mirror while allowing you to safely pull the blade upward along the complex contours of your lower throat.
Dry-Run Drills: Train Your Hands Before Steel Meets Skin
The FAQ at the bottom of this guide mentions practicing with a blade guard on, but let’s make that concrete. Your first straight-razor shave should not be the first time your fingers have ever held the tool at shaving angles. A few minutes of dry rehearsal builds the muscle memory that keeps you calm when the edge is live.
Drill 1: The no-blade grip run. Take the blade out of your shavette, or work with a closed traditional straight held by the tang. Sit in front of a mirror and walk through all four grips — standard, backhand, reverse, reverse backhand — switching between them slowly. Watch your wrist: the motion should come from your fingers and elbow, with the wrist locked in a stable position. This is the same progression barbers teach beginners on the shop floor — grip first, blade later.
Drill 2: The balloon test. Lightly glide your (guarded or bladeless) razor across an inflated balloon at a shallow angle. If the angle is right and your pressure is genuinely zero, the steel slides over the latex without popping it. Too steep or too much pressure, and you’ll know instantly. It’s a humbling little exercise, and it teaches the two things beginners struggle with most: holding 30 degrees and trusting the tool’s weight instead of pushing.
Drill 3: Calibrate on the back of your hand. Before your first pass, lay the spine of the real razor flat against the back of your non-dominant hand and tilt until the edge just makes contact — that’s your 30 degrees. Feel it, remember it, then reproduce it on your cheek. Do this every shave for your first two weeks. It takes five seconds and removes all the guesswork from angle-finding.
Run these drills for a few evenings before your first real shave, and your hands will already know the choreography when it counts.
4. Mapping Your Face: A Step-by-Step Practical Routine
Now that you know the grips and the mechanics of skin stretching, let’s look at how to put this knowledge into practice during a standard three-pass shave. Proper technique requires a step-by-step approach to ensure you don’t rush through the sensitive areas of your face.
Step 1: Pre-Shave Preparation
Before touching the steel to your face, ensure your beard is completely soft and hydrated. A critical question many beginners ask is: Should I shave before or after a shower? The answer is always after (or during) a hot shower. Prolonged exposure to steam and warm water deeply hydrates the hair shaft, making it significantly softer and much easier for a straight edge razor to slice through cleanly.
Step 2: The Cheeks and Sideburns (With the Grain)
Start on the flat area of your right cheek (if right-handed). Use the Standard Grip. Raise your left hand over your head, place your fingertips on your upper cheekbone, and pull the skin firmly upward. Hold the razor at a 30-degree angle and make short, light, downward strokes from the top of your sideburn down to your jawline. Once the right side is clear, transition to the Backhand Grip to tackle the left cheek.
Step 3: Navigating the Jawline and the Adam’s Apple
The jawline represents a sharp architectural corner. If you maintain a fixed hand position, the cutting angle will instantly spike as you clear the bone, slicing into your skin. To prevent this, tilt your head back slightly and use your free hand to pull your cheek skin upward, effectively drawing your jawline hair up onto the flat surface of your cheek.
When you move down to the throat, you must exercise extreme caution. Learning how to shave over the Adam’s apple requires a clever trick: rather than running the sharp blade directly over the sharp cartilaginous protrusion, use your free fingers to slide the skin an inch to the left or right. This allows you to shave that hair safely over a flat, muscular bed, completely avoiding the dangerous central ridge.
Step 4: The Upper Lip and Chin
The chin and mustache area contains the densest, coarsest whiskers on the face. For the upper lip, curl your top lip tightly over your teeth to stretch the skin naturally. Hold the razor in a modified Standard Grip, choking up slightly on the shank for maximum precision. Use tiny, meticulous, vertical strokes. For the ball of the chin, tilt your head back and use your free hand to pull the skin taut from the throat downward, flattening the curve as much as possible.
5. Troubleshooting and Refining Your Grip Technique
As you embark on your straight edge razor journey, you will inevitably hit a few roadblocks. Your muscles will get tired, your fingers might slip, or you may experience minor skin irritation. Recognizing these common errors early will protect your skin and accelerate your progress.
Issue 1: The Razor Is Shaking or Trembling
- The Cause: You are holding the razor with a white-knuckle, defensive death grip. Excessive tension in your fingers travels straight up your forearm, causing micro-tremors that translate into nicks.
- The Fix: Take a deep breath and relax your hand. Your fingers should hold the steel securely enough that it won’t fall, but lightly enough that someone could easily slide the razor out of your hand. Think of it like holding a fountain pen.
Issue 2: The Blade Is Tugging and Skipping
- The Cause: This usually points to an incorrect blade angle (holding the razor too flat), insufficient skin stretching, or a blade that desperately needs maintenance. If you are using a replaceable-blade straight razor (shavette) and notice severe pulling, it’s a clear signal that your edge is spent. Just as you know when to change your safety razor blade to prevent irritation, you must replace your shavette blade every 3 to 5 shaves to maintain a clean, frictionless slice.
- The Fix: Increase your blade angle slightly closer to 30 degrees, maximize your skin stretch with your free hand, and ensure your lather is rich, dense, and properly hydrated.
Issue 3: Hand Fatigue Mid-Shave
- The Cause: You are trying to do all the work using small, isolated movements of your wrist and fingers.
- The Fix: Lock your wrist into a stable position and execute your shaving strokes using the larger muscle groups of your elbow and shoulder. This locks in a consistent cutting angle throughout your stroke and dramatically reduces muscle fatigue.
About the author: Chris Garczynski
Chris is a Minnesota-based wet shaving enthusiast and founder of Wet The Blade. After years of testing safety razors, straight razors and grooming products, he shares honest, practical shaving guides \u2014 no sponsored fluff.
Shavette Shavers: Why Your Grip Has to Change
Most of this guide assumes a traditional straight razor — a hefty piece of steel whose weight does the cutting for you. If you shave with a shavette (a straight-style handle that takes disposable blades), some of that advice needs translating, because a shavette weighs a fraction of what a full straight does.
With no meaningful weight behind the edge, “let the steel do the work” becomes “let the sharpness do the work” — and the disposable blades shavettes take are extremely sharp. That combination makes shavettes less forgiving of the two classic beginner errors: too steep an angle and too much pressure. Many shavers find they need to choke up slightly on the shank, keeping their fingers closer to the cutting edge for finer control, and to shorten their strokes compared to what they’d take with a traditional straight.
The four grips in this guide still apply — the geometry of your face doesn’t change — but expect to run them with a lighter, more deliberate touch. If you’re learning on a shavette before investing in a traditional straight (a common and sensible path), treat it as training with the difficulty turned up: the habits that keep you nick-free on a shavette will feel effortless once you pick up a weighted razor.
One practical note: because shavette blades are replaced rather than stropped, skip the stropping section above — but do keep the dry-run drills. The balloon test is arguably even more valuable with a shavette, since there’s no weight cushioning your mistakes.
Listen to the Shave: Audio Feedback Most Beginners Miss
Your eyes and hands aren’t your only instruments — your ears are in on it too. A straight razor in good working order, at the correct angle, over well-prepped stubble, makes a distinct sound: a quiet, even scraping, something like fine sandpaper drawn lightly across wood. When you hear that steady whisper, your angle and pressure are right. Keep going.
Learn the two sounds that mean “stop and adjust.” The first is tearing or catching — an irregular, grabby noise, often paired with a tugging sensation. That usually means your angle has gone too shallow (the spine is nearly flat on the skin) or your lather has dried out. Re-wet the area, re-check your 30 degrees, and try again. The second is silence on a pass that should be cutting. If the razor glides noiselessly and leaves stubble behind, the edge likely isn’t engaging at all — again, angle too flat.
Sound also tells you about your lather. A rich, slick lather lets the blade sing evenly; a thin, dry one makes every stroke sound scratchy and harsh. Many experienced shavers diagnose a failing lather by ear before they notice it by feel.
One caveat: audio feedback assumes a properly honed edge. If the razor is genuinely dull, no angle adjustment will produce that clean scraping whisper — which is your cue to strop, and if stropping doesn’t fix it, to consider whether the edge needs professional honing.
Conclusion: The Path of Patience
Learning how to hold a straight edge razor is an exercise in mindfulness, patience, and body awareness. It is a rewarding skill that forces you to slow down and focus entirely on the physical feedback of your hands. Expect your first few shaves to feel slightly clumsy and awkward; that is completely normal. Your brain is actively building entirely new neural pathways and muscle memory.
Start slowly by using your straight edge razor only on the easy, flat planes of your cheeks for the first week, then finish the rest of your face with your familiar safety razor. As your fingers adapt to the steel’s weight, balance, and orientation, begin introducing the backhand and reverse grips to target your jawline and neck. Within a month of consistent practice, the transitions between these grips will become completely instinctive, transforming your morning grooming routine from a tedious chore into a luxurious, therapeutic ritual.
References and Authoritative Resources
- The Barbering Textbook (National Barber Association Standards) – Traditional Razor Geometry and Grip Ergonomics.
- Dermatological Guide to Wet Shaving and Skin Health – The Impact of Blade Angles and Skin Tension on Epidermal Micro-Trauma.
- The Wet Shaving Community Archive – Comparative Studies on Ambidextrous vs. Fixed-Hand Straight Razor Ergonomics.
Frequently Asked Questions
Q: What are the different straight razor grips?
A: The four essential grips are the standard grip (thumb under the shank, three fingers on top, pinky on the tang), the reverse grip for the opposite cheek, the backhand grip for tricky angles like under the nose, and a two-handed grip beginners use while learning. Master the standard grip first.
Q: How do you hold a straight razor?
A: Open the razor so the scales extend back from the blade. Place your thumb under the shank on the jimps, rest three fingers along the top of the shank, and let your pinky sit on the tail of the tang. Keep your grip relaxed, hold the blade at about 30 degrees to your skin, and let the weight of the steel do the work.
Q: How should a beginner hold a straight edge razor?
A: Start with the standard grip, keep your strokes short, and use your free hand to stretch the skin flat. Practice opening, holding, and angling the razor (with a blade guard on) until the grip feels natural before your first real shave.